Introduction
Customers no longer need to be at home to receive a call. In fact, they can be almost anywhere. With the LightBurst Broadband Single Number Service, customers determine how to manage incoming calls using up to nine different phone numbers to Find them. This service is ideal for real estate agents, small business owners, or anyone who’s always on the go.
Once they receive a call, they don’t have to stay in one place to keep the conversation going. Calls from this service may be transferred between phones in the phone list by simply pressing the star key followed by the transfer digit. This allows the customers to be mobile when they need to be.
In the event the customer cannot be reached, the LightBurst Broadband Single Number Service has the added ability to forward calls directly to the LightBurst Broadband Voice Mail Service. This feature is available to anyone who subscribes to both the LightBurst Broadband Voice Mail and the LightBurst Broadband Single Number Services.
Additionally, those customers who subscribe to both services can customize their LightBurst Broadband Single Number Service by recording their name in their Voice Mail mailbox. Their recorded name will be played as a part of the search for announcements voiced by the LightBurst Broadband Single Number Service.
The Web Portal Single Number feature allows end users to manage their LightBurst Broadband Single Number Service settings and call sequence from their PC using a Web-browser-based interface. See the Web Portal Service description for requirements and general usage information.
Web Portal Single Number
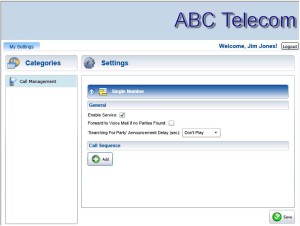
The Single Number web interface (see Figure 5-1 ) is accessed by following these steps:
- Login to the Web Portal Service (see the Web Portal Service description for more information).
- Select the My Settings tab.
- Click Call Management in the Categories section.
- Press the expand button next to Single Number in the Settings section.
The General and Call Sequence settings for the logged in subscriber will be displayed.
Figure 5-1 Single Number – General Settings
General Settings
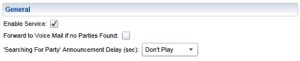
The General section (see Figure 5-2 ) is used to display and configure the Single Number settings that are available to subscribers.
Figure 5-2 General Section
The following settings are found in this section:
| Enable Service | Check this box to turn on the Single Number features, or uncheck this box to turn off the Single Number features. |
| Forward to Voice Mail if no Parties Found | Check this box if calls should be forwarded to the Voice Mail Service if the call is not answered. |
| “Searching For Party†Announcement Delay (sec) | Select the number of seconds to wait before the “Searching For Called Party†announcement is played to the caller. Options include: Don’t Play, and every 2-second interval between 2 and 60 seconds (e.g. 2, 4, 6… 56, 58, 60). |
Changes to fields in the General section will not become active until they are saved by pressing the Save button in the lower-right corner of the screen.
Call Sequence
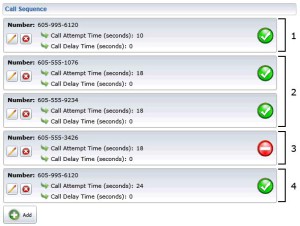
The Call Sequence section of the Single Number web interface is used to manage the list of phone numbers the LightBurst Broadband Single Number Service will dial while trying to locate the subscriber. The Call Sequence list may contain a maximum of nine entries.
Initially, the Call Sequence list will be empty unless phone number entries have been previously defined by the LightBurst Broadband Staff Administrator. An unconfigured Call Sequence (see Figure 5-3 ) will only have an Add button. Figure 5-4 showns an example of a Call Sequence after five phone numbers have been added.
Note:Additions, deletions, and edits to the Call Sequence will not become active until they are saved by pressing the Save button in the lower-right corner of the screen.
Figure 5-3 Unconfigured Call Sequence Section

Figure 5-4 Configured Call Sequence Section
Adding Call Sequence Entries
To add a new row to the Call Sequence, press the Add button located below the list. An Edit Phone Entry popup window similar to Figure 5-5 will be displayed. In the upper right-hand corner of the Edit Phone Entry window there are three possible labels: Main, Friends, and Schedule. Clicking on each of these labels will display different settings for the current entry. The label that is currently selected will be shown in bold letters. The Main label is selected by default.
Once all of the settings have been configured, press the Apply button in the lower right-hand corner of the Edit Phone Entry window to complete the entry.
Main Settings
The Main section ( Figure 5-5 ) of the Edit Phone Entry window is used to configure the primary properties of each phone number in the Call Sequence list.
Figure 5-5 Edit Phone Entry – Main

The fields in the Main section are described below:
| Number To Dial | The 10-digit phone number to be dialed. The same phone number may be listed multiple times in the Call Sequence. |
| Order | The order in which this phone number will be dialed relative to the other numbers in the Call Sequence. Phone numbers that share the same Order value will be dialed simultaneously. |
| Verify | Should the service verify that the subscriber is present when this number is answered (as opposed to being directly connected, which would be the case if the call is answered by Voice Mail or an answering machine)? Select Yes or No. |
| Call Attempt Time (seconds) | The maximum number of seconds the service should wait for this number to answer before moving on to the next number in the list. The valid range for this field is 1 to 120 seconds. |
| Call Delay Time (seconds) | The number of seconds the service should wait to dial this number after reaching this number in the Call Sequence. The valid range for this field is 0 to 30 seconds. |
| Transfer Digit | The speed dial digit pressed to transfer a call to this phone number. |
Friends Section
The Friends section ( Figure 5-6 ) of the Edit Phone Entry window is used to manage the list of the subscriber’s contacts and groups that are allowed to override the weekly schedules defined in the Schedule section.
Figure 5-6 Edit Phone Entry – Friends
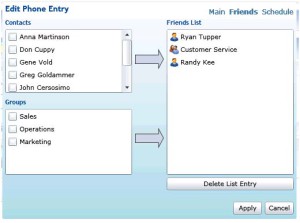
The left-hand side of the Friends section contains lists of the contacts and groups that have been defined by this subscriber in the My Contacts tab of the Web Portal Service interface. For more information on the My Contacts tab, see the Web Portal Service description. The Friends List on the right-hand side of the section displays the contacts and groups that are allowed to bypass the schedule restrictions of this phone number.
To add a contact or group to the Friends List, check the box next to the contact or group in the lists on the left-hand side and press the arrow button located to the right of the appropriate list. The checked items will be added to the Friends List. Items can be removed from the Friends List by selecting them in the Friends List and pressing the Delete List Entry button located below the list.
Schedule Section
The Schedule section ( Figure 5-7 ) of the Edit Phone Entry window contains a weekly calendar that used to define the time and days when this phone entry is available to accept incoming calls.
Figure 5-7 Edit Phone Entry and Schedule
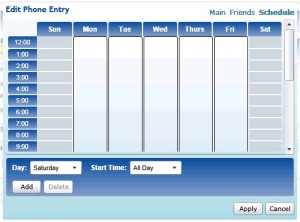
The phone number, by default, is available 24 hours a day, 7 days a week, and will remain so unless the schedule is changed.
To configure the phone number to be unavailable for an entire day, click on the column for the day of the week you wish to make inactive. The schedule column for that day will begin flashing. Press the Delete button and the availability schedule for that day will be removed, making the entire day inactive.
To configure the phone number to be available for an entire day, select the day of the week in the Day selection box and also select the All Day option in the Start Time selection box. Next, press the Add button. (The Add button may also be displayed as a Save button if there is an ongoing edit being made to the schedule for the selected day of the week).
To specify a custom time frame for this phone number to be available, select the day of the week in the Day selection box and select the time of day when this phone number starts being active in the Start Time box. An End Time selection box will be displayed. Select the time of day when this phone number will stop being active in the End Time box. Press the Add or Save button located below the Day field. The LightBurst Broadband Single Number Service will not call this number during the specified day of the week unless the time of the call is between the specified Start Time and End Time.
Editing Call Sequence Entries
To modify a Call Sequence list entry, press the edit button in the phone number row you wish to change. An Edit Phone Entry popup window (see Figure 5-5 ), populated with the current settings of the selected entry, will be displayed.
The Edit Phone Entry window functions the same as when adding a phone entry. Once the desired changes have been made, press the Apply button in the Edit Phone Entry window. The Edit Phone Entry window will be closed and the phone number row in the Call Sequence list will be updated with the changes.
Deleting Call Sequence Entries
To remove an phone number from the Call Sequence list, press the delete button below the phone number row you wish to delete. The row containing the phone number and its settings will be removed from the list and will be deleted when the Save button in the lower-right corner of the screen is pressed.
Enabling/Disabling Call Sequence Entries
The enable/disable button located on the right side of each phone number row in the Call Sequence allows the subscriber to quickly activate or deactivate phone numbers by clicking on the buttons instead of deleting and re-adding the entries.
The states of the enable/disable button are as follows: